Last Updated on April 20, 2020
Windows 7 is so much better than previous versions of Windows. It’s very intuitive, yet sometimes it can get really tricky. The microphone was one of the biggest “surprises” I’ve got since I installed Windows 7: I always had to shout so people can hear my voice over Skype. At first, I didn’t make the connection between this and the fact that I’ve changed the operating system, I just thought my microphone was lousy and I should get a better one. I’m glad I didn’t. I don’t know how expensive an expensive microphone is, but I managed to save all that money thanks to this trick I’m going to share with you in a moment. Browsing through menus, I discovered that Windows 7 has an option called “Microphone boost”, which I didn’t know about. This is how to find it:
Click on Start orb, then go to Control Panel and choose Sound. A pop-up menu will open.
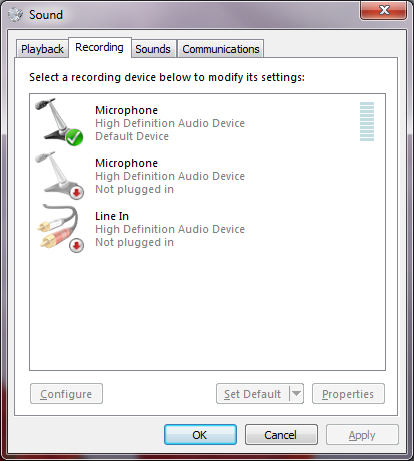
You need to go to the second tab, Recording:

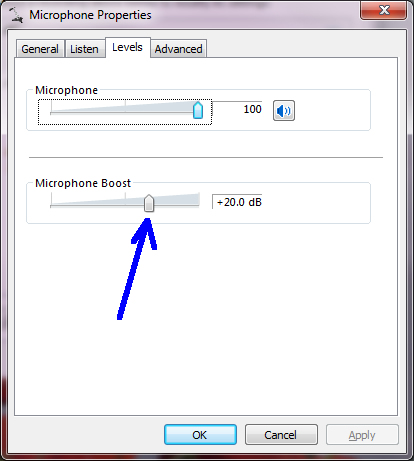
The list will show all recording devices that can be plugged in your computer. You’ll probably have only one of them enabled, corresponding to your microphone. Click on it, then click on the Properties button. This is what you’ll see:
In the next menu, make sure the microphone volume (the first slider) is set to maximum. The second slider is for Microphone Boost and it is set to zero by default. Move it to +20.0 dB and test your microphone again. If you’re not happy, go back and choose another value, until you get the volume you want.
It worked very well for me. If you don’t believe it, just call me and see it for yourself 🙂


Thanks! My microphone has been quite low, and this information proves to be helpful.
Awesome. worked great! My built in laptop mic has always been very quiet. This worked like a charm for me.